Tuesday, October 29, 2013

Csf tutorial

CSF Advanced Allow/Deny Filters
In /etc/csf.allow and /etc/csf.deny you can add more complex port and ip filters using the following format (you must specify a port AND an IP address):
tcp/udp|in/out|s/d=port|s/d=ip|u=uid
Broken down:
tcp/udp : EITHER tcp OR udp OR icmp protocol
in/out : EITHER incoming OR outgoing connections
s/d=port : EITHER source OR destination port number (or ICMP type)
(use a _ for a port range, e.g. 2000_3000)
s/d=ip : EITHER source OR destination IP address
u/g=UID : EITHER UID or GID of source packet, implies outgoing connections, s/d=IP value is ignored
Note: ICMP filtering uses the “port” for s/d=port to set the ICMP type. Whether you use s or d is not relevant as either simply uses the iptables –icmp-type option. Use “iptables -p icmp -h” for a list of valid ICMP types. Only one type per filter is supported
Examples:
# TCP connections inbound to port 3306 from IP 11.22.33.44
tcp|in|d=3306|s=11.22.33.44
# TCP connections outbound to port 22 on IP 11.22.33.44
tcp|out|d=22|d=11.22.33.44
Saturday, October 19, 2013

Making a loadbalancer with CentOS using Linux Virtual Server

When you are new to all terminology Red Hat is using, it can be challenging to understand what actions to take to create a simple load-balancer with Linux. Here is some information to get you started.
Terminology:
  • piranha This is a package that provides a configuration interface for setting up LVS.
  • ipvs The name of the module that allows a load-balancing on Linux.
  • ipvsadm A package (and a command) that makes administrating ipvs possible. Be aware, you either user piranha-gui or /etc/sysconfig/ipvsadm to configure ipvs.
  • LVS Linux Virtual Server - the project name of all tools used in this document.
  • pulse A service (/etc/init.d/pulse) that runs on both active and backup machine and opens a port to make checking possible. piranha-gui configures everything, pulse actually activates all configurations.
  • nanny A process started by pulse to monitor the realservers.
  • nat Network Address Translation. A common combination with LVS. In case NAT is uses, the loadbalancer/director/LVS accepts traffic on one the VIP and sends traffic to the realservers. Be aware, the current implementation of ipvsadm does not properly use Source NAT, it currently does not rewrite the source address.
  • direct routing A method of routing available in LVS. Traffic is received on the VIP, sent through to the realservers. The realservers receive the traffic as if it was sent to the VIP, so the VIP must be configured on the realservers. To avoid arp-caches to register the wrong MAC-address-IP-address combination, a few "tricks" must be done.
  • wlc Weighted Least Connections, an algorithm to balance load to realservers.
  • VIP Virtual IP. The IP-address the service is configured on.
  • RIP Real server IP. The IP-address of a real-server.
  • realserver The server providing the actual service. This can be Linux, Windows, whatever.
Here is an overview of a possible setup:
Steps to finish before eternal succes:

Install piranha-gui

# yum install piranha-gui

(modify 172.16.0.0/24 to whatever network you are using on the realserver network.)

Configure services

# chkconfig httpd on
# chkconfig piranha-gui on
# chkconfig pulse on
# sed -i 's/net.ipv4.ip_forward = 0/net.ipv4.ip_forward = 1/' /etc/sysctl.conf
# echo "*nat
:PREROUTING ACCEPT [46:3346]
:POSTROUTING ACCEPT [431:32444]
:OUTPUT ACCEPT [431:32534]
-A POSTROUTING -o eth0 -j MASQUERADE
COMMIT
*filter
:INPUT ACCEPT [4186:1094786]
:FORWARD ACCEPT [729:111992]
:OUTPUT ACCEPT [4266:388099]
-A FORWARD -i eth1 -j ACCEPT
COMMIT" > /etc/sysconfig/iptables
# chkconfig iptables on
# sed -i 's/SELINUX=enabled/SELINUX=disabled/' /etc/sysconfig/selinux

Configure via webinterface

Execute these steps to be able to use the piranha-gui web interface:
# service httpd start
# piranha-passwd
# service piranha-gui start

Open a browser and open your servers IP-address, port 3636. URL looks something like this: http://192.168.202.50:3636

Synchronize /etc/sysconfig/ha/lvs.cf

You will need to have the piranha configuration the same on both machines. Here are some hints. Do this on both machines, just switch the IP-address.
# ssh-keygen
# scp .ssh/id_rsa* 192.168.202.110:./.ssh/
# cp .ssh/id_rsa.pub .ssh/authorized_keys

Now you should be able to connect to both machines without using a password.
# cat update-lvs.cf
#!/bin/sh

copiedserialno=$(grep serial_no /tmp/lvs.cf | awk '{ print $NF }')
runningserialno=$(grep serial_no /etc/sysconfig/ha/lvs.cf | awk '{ print $NF }')

if [ "$copiedserialno" -gt "$runningserialno" ] ; then
mv /tmp/lvs.cf /etc/sysconfig/ha/lvs.cf
fi
# crontab -l
* * * * * /usr/bin/scp /etc/sysconfig/ha/lvs.cf 192.168.1.46:/tmp > /dev/null
* * * * * /root/update-lvs.cf

Reboot the server.

To activate all changes, simply reboot the load-balancer.

Monday, October 14, 2013

Install SVN (Subversion) Server on Fedora 19/18, CentOS/Red Hat (RHEL) 6.4/5.9

What is SVN (Subversion)?

Subversion is a free/open-source version control system. Subversion manages files and directories, and the changes made to them, over time. This allows you to recover older versions of your data, or examine the history of how your data changed. In this regard, many people think of a version control system as a sort of “time machine”.

Install SVN (Subversion) Server on Fedora 19/18/17/16/15/14, CentOS 6.4/6.3/6.2/6.1/6/5.9, Red Hat (RHEL) 6.4/6.3/6.2/6.1/6/5.9

1. Change root user

su -
## OR ##
sudo -i

2. Install needed packages (mod_dav_svn and subversion)

yum install mod_dav_svn subversion
Note: If you don’t have Apache installed already, this command installs it also. Read more about installing Apache and PHP >>

3. Modify Subversion config file /etc/httpd/conf.d/subversion.conf

Add following config to /etc/httpd/conf.d/subversion.conf file:
LoadModule dav_svn_module     modules/mod_dav_svn.so
LoadModule authz_svn_module   modules/mod_authz_svn.so
 
<Location /svn>
   DAV svn
   SVNParentPath /var/www/svn
   AuthType Basic
   AuthName "Subversion repositories"
   AuthUserFile /etc/svn-auth-users
   Require valid-user
</Location>

4. Add SVN (Subversion) users

Use following command:
## Create testuser ##
htpasswd -cm /etc/svn-auth-users testuser
New password: 
Re-type new password: 
Adding password for user testuser
 
## Create testuser2 ##
htpasswd -m /etc/svn-auth-users testuser2
New password: 
Re-type new password: 
Adding password for user testuser2
Note: Use exactly same file and path name as used on subversion.conf file. This example use /etc/svn-auth-users file.

5. Create and configure SVN repository

mkdir /var/www/svn
cd /var/www/svn
 
svnadmin create testrepo
chown -R apache.apache testrepo
 
 
## If you have SELinux enabled (you can check it with "sestatus" command) ##
## then change SELinux security context with chcon command ##
 
chcon -R -t httpd_sys_content_t /var/www/svn/testrepo
 
## Following enables commits over http ##
chcon -R -t httpd_sys_rw_content_t /var/www/svn/testrepo
Restart Apache:
/etc/init.d/httpd restart
## OR ##
service httpd restart
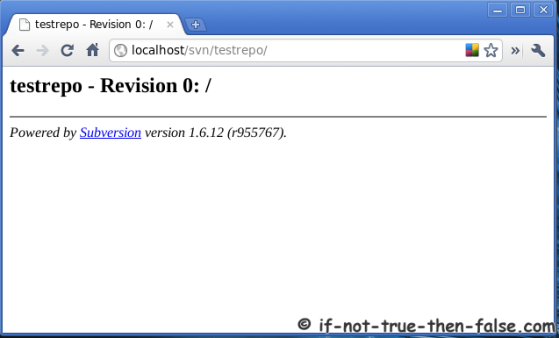
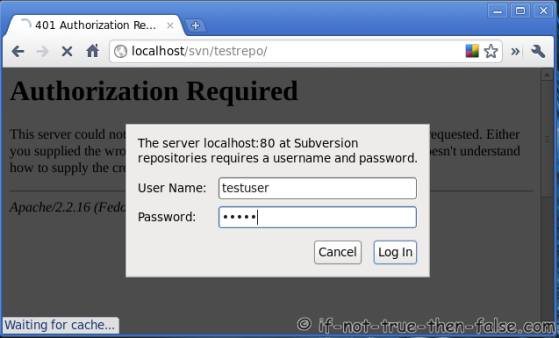
Goto http://localhost/svn/testrepo address and you should see something like following, write username and password:
SVN Subversion username and password
SVN testrepo revision 0:
SVN Subversion Repository Revision 0

6. Configure repository

To disable anonymous access and enable access control add following rows to testrepo/conf/svnserve.conf file:
## Disable anonymous access ##
anon-access = none
 
## Enable access control ##
authz-db = authz

7. Create trunk, branches and tags structure under testrepo

Create “template” directories with following command:
mkdir -p /tmp/svn-structure-template/{trunk,branches,tags}
Then import template to project repository using “svn import” command:
svn import -m 'Initial import' /tmp/svn-structure-template/ http://localhost/svn/testrepo/
Adding         /tmp/svn-structure-template/trunk
Adding         /tmp/svn-structure-template/branches
Adding         /tmp/svn-structure-template/tags
 
Committed revision 1.
Check results on browser and see testrepo revision 1:

Linux history command(change HISTSIZE variable)

History is a very handy command to see what was typed and executed in a shell for a period of time.
For example, you are troubleshooting Linux server and you want to see the last 20 commands executed.
$ history 20
Or you want to find all commands with sudo word in them.
$ history | grep sudo
You can combine with less, tail and so on, it all depends of your needs.
After search you’ve found a command with number 234 and you want to execute it again.
$ !234
For more details about history command -> man history.
So how this works, how long is history and how to change its size?
Shell command history is stored in a .bash_history file in your /home folder ( cat .bash_history to see all the entries there ).
Number of commands is defined by histsize variable.
Type
$ echo $HISTSIZE
or
$ env | grep HISTSIZE
to see the number of commands that can be stored in this file.
My default number on Oracle Linux is 1000.
But what if you want to store 3000 commands for example, how can you change this variable?
Well quite simply, just use gedit or vi editor.
Change .bash_profile, add HISTSIZE=3000, export this variable to override one in /etc/profile, save file and load the changes with
$ source .bash_profile
Your .bash_profile should look like this
# User specific environment and startup programs
PATH=$PATH:$HOME/bin
………
HISTSIZE=3000
export PATH HISTSIZE
So now you can store up to 3000 command in your history.
echo 'export HISTTIMEFORMAT="%d/%m/%y %T "' >> ~/.bashrc
source ~/.bashrc

ĐỒNG BỘ HÓA THỜI GIAN GIỮA CÁC SERVER LINUX - NTP (NETWORK TIME PROTOCOL)

Giao thức NTP (Network Time Protocol - Giao thức đồng bộ thời gian mạng) là một giao thức để đồng bộ đồng hồ của các hệ thống máy tính thông qua mạng dữ liệu chuyển mạch gói với độ trễ biến đổi. Giao thức này được thiết kế để tránh ảnh hưởng của độ trễ biến đổi bằng cách sử dụng bộ đệm jitter. NTP cũng là tên gọi của phần mềm được triển khai trong dự án Dịch vụ NTP Công cộng (NTP Public Services Project).


- Tổng quan về hoạt động:
+ NTP client gửi một gói tin, trong đó chứa một thẻ thời gian tới cho NTP server.
+ NTP server nhận được gói tin, gửi trả lại NTP client một gói tin khác, có thẻ thời gian là thời điểm nó gửi gói tin đó đi.
+ NTP client nhận được gói tin đó, tính toán độ trễ, dựa và thẻ thời gian mà nó nhận được cùng với độ trễ đường truyền, NTP client sẽ set lại thời gian của nó.

Thật dễ dàng để cài đặt và cấu hình một NTP server làm đồng hồ của hệ thống.

Kiểm tra xem ntp đã được cài trên server chưa, ta dùng lệnh sau:

#rpm -qa | grep ntp

Nếu chưa có, ta có thể cài đặt bằng lệnh sau

#yum -y install ntp

Tiếp theo, ta cấu hình file /etc/ntp.conf để thêm vào các ntp server tùy ý

#vi /etc/ntp.conf

Mặc định sẽ có 1 số NTP server trong file ntp.conf.Bạn cũng có thể thêm server NTP tùy vào khu vực và mục đích hệ thống của bạn.Ở đây, mình sẽ thêm các NTP server sau:

server 0.asia.pool.ntp.org
server 1.asia.pool.ntp.org
server 2.asia.pool.ntp.org
server 3.asia.pool.ntp.org

Tham khảo thêm về một số NTP server trên thế giới và Châu Á tại đây: pool.ntp.org: NTP Servers in Asia,asia.pool.ntp.org

Khởi động dịch vụ ntpd mỗi khi khởi động

#chkconfig ntpd on

Khởi động hoặc dừng dịch vụ ntp

#service ntpd start
#service ntpd stop
#service ntpd restart

Dùng lệnh sau để kiểm tra ntp đã running chưa

#pgrep ntp

Xem những server NTP mà system của ta đã đồng bộ

#ntpq -p

Để quá trình đồng bộ được chính xác, thì các tham số delay, offset phải có giá trị khác 0 và tham số jitter có giá trị dưới 100.

Xem trạng thái của quá trình đồng bộ

# ntpstat